Unlock Tender, Non-Rubbery Fried Calamari: The Milk Soak Secret
Few appetizers delight quite like a perfectly executed plate of fried calamari. The mere thought conjures images of golden-brown rings, a delicate crunch, and a succulent, tender interior. Yet, for many home cooks, achieving this restaurant-quality result can feel like chasing a culinary unicorn. The dreaded outcome? Rubbery, greasy, or flavorless squid that disappoints rather than impresses. If you’ve ever wondered how your favorite Italian or Mediterranean spot consistently serves up flawless calamari, you’re about to discover a game-changing secret: the humble milk soak. This technique is the cornerstone of a truly exceptional fried calamari recipe, transforming a challenging dish into a consistently achievable triumph.What Exactly is Calamari? A Brief Introduction to Your New Favorite Seafood
Before we dive into the tenderizing magic, let’s clarify what we’re working with. Is calamari squid or octopus? This is a common question! Calamari is simply the Italian word for squid, a fascinating cephalopod and a close cousin to the octopus. While both are delicious, squid typically has a firmer texture and a milder, slightly sweeter flavor profile that makes it incredibly versatile in cooking. Globally, there are hundreds of squid species, but only a select few are commonly used in cuisine, with the most popular often being available as tubes or rings. Thankfully, squid is widely accessible and surprisingly affordable. You’ll often find it at your local fish counter, but increasingly, high-quality, pre-cleaned frozen calamari tubes or rings are available in the freezer aisle of most grocery stores. Using pre-cleaned frozen options saves considerable prep time, making your journey to perfect fried calamari even smoother. Whether you choose fresh or frozen, the goal remains the same: transforming this mild seafood into an irresistible, tender delight.The Game-Changer: How a Simple Milk Soak Guarantees Tender Calamari
Here it is – the secret weapon that elevates your fried calamari recipe from good to absolutely glorious: a salted milk soak. This isn't just a traditional trick; it's a scientifically sound method for achieving unparalleled tenderness and flavor.Why does a milk soak work so effectively?
- Tenderization Power: Milk contains lactic acid, a mild acid that gently breaks down the tough muscle fibers in the calamari. Unlike harsher acids like lemon juice, which can sometimes "cook" or firm up delicate seafood if left too long, lactic acid works slowly and subtly, resulting in a remarkably tender texture without any rubberiness.
- Taming the "Fishy" Factor: While squid has a mild flavor, some may find a subtle oceanic aroma. The milk soak helps to neutralize any unwanted "fishy" smells, leaving you with a cleaner, sweeter-tasting calamari that truly shines.
- Enhanced Adhesion: The milk proteins adhere to the surface of the squid, creating a slightly tacky base that helps your flour coating stick much more effectively. This ensures a consistent, crispy crust that doesn't flake off during frying.
How to Execute the Milk Soak:
- Prepare Your Calamari: If using whole tubes, clean them thoroughly (remove the quill, entrails, and skin) and slice them into rings approximately 3/4-inch thick. This thickness is crucial for ensuring the calamari cooks through to tender perfection while the coating achieves a beautiful golden crisp.
- Mix the Soak: In a bowl, combine about 1/2 cup of milk (any type will do, but whole milk adds a touch more richness) with 1 teaspoon of kosher salt. Stir until the salt is fully dissolved.
- Soak and Chill: Add your calamari rings to the salted milk solution, ensuring they are fully submerged. Cover the bowl and refrigerate for at least 30 minutes, but no longer than an hour. This short period is all that's needed for the milk to work its magic.
Beyond the Soak: Comprehensive Tips for Your Best Fried Calamari Yet
While the milk soak is undoubtedly the star, crafting truly exceptional fried calamari involves a few other critical techniques. Combine these tips with the milk soak, and you'll be well on your way to how to make restaurant-style crispy fried calamari at home.1. The Perfect Cut: Size Matters for Tenderness and Crunch
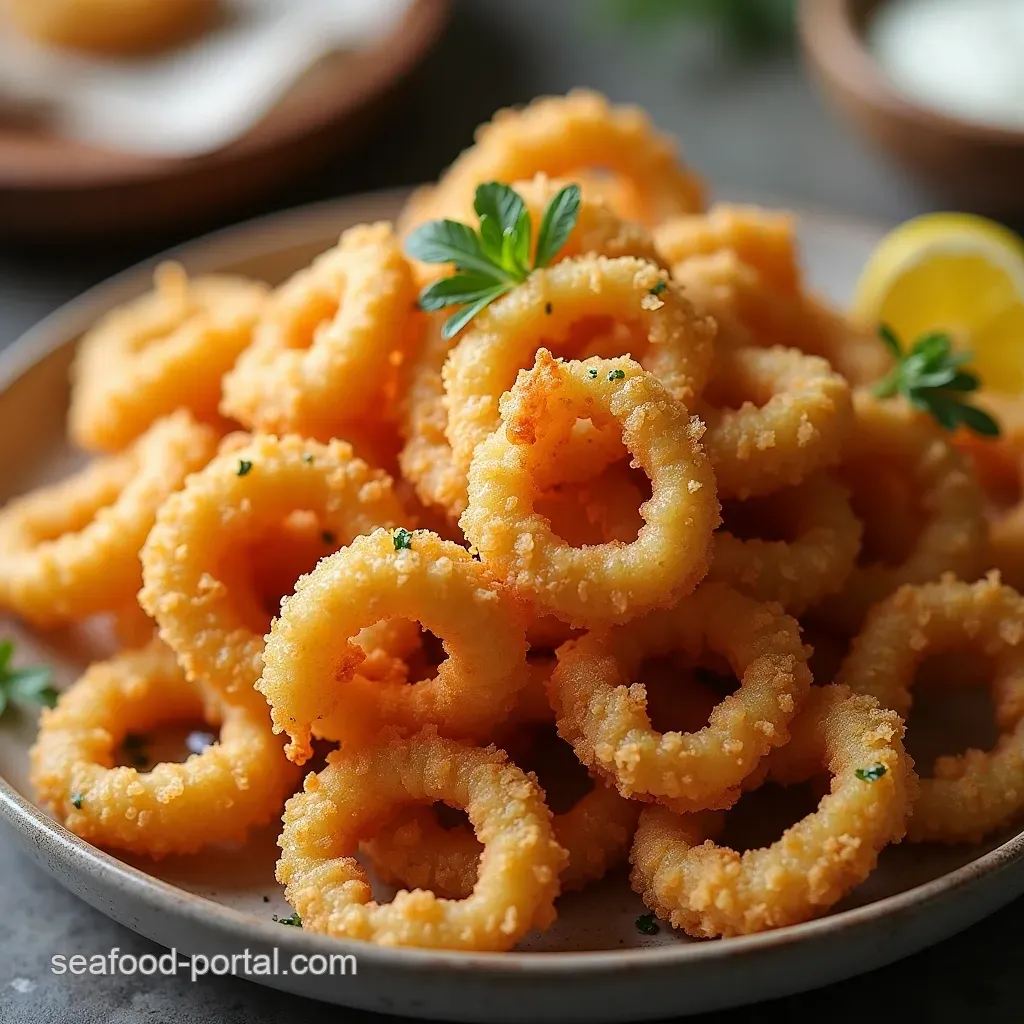
As mentioned, cutting your calamari tubes into 3/4-inch thick rings is key. Thinner rings cook too quickly, leading to a tough, overcooked interior before the coating has a chance to crisp up. Thicker rings, however, allow for a longer cooking time – just enough for the batter to become beautifully golden and crunchy, while the inside remains unbelievably tender.2. The Ultimate Crispy Coating: A Blend for Golden Perfection
Forget plain flour! The secret to that light, airy, and incredibly crispy exterior lies in a specific flour mixture.- All-Purpose Flour: Forms the primary base for the coating.
- Cornstarch: This is your secret weapon for extra crispiness. It helps absorb moisture and creates a lighter, crunchier texture.
- Baking Powder: A small amount of baking powder creates tiny air bubbles in the coating, making it incredibly light and ethereal rather than dense and doughy.
- Seasonings: Don't forget salt, freshly ground black pepper, and perhaps a pinch of garlic powder or smoked paprika to infuse flavor into the crust itself.
3. The "Resting" Period: Ensuring Your Coating Stays Put
Once your calamari rings are coated in the flour mixture, resist the urge to fry them immediately. Instead, place them in a colander or on a wire rack set over a baking sheet for a few minutes (5-10 minutes is usually sufficient). This crucial step allows the moisture from the calamari to slightly rehydrate the flour coating, creating a stronger bond. This means less coating will fall off in the hot oil, ensuring every piece has that perfect, uniform crunch. This also happens naturally as you prepare to fry in batches and wait for your oil to heat up.4. Frying Fundamentals: Temperature, Batches, and Speed
Frying calamari is a quick process, and proper technique is vital.- Oil Temperature: Heat a neutral oil (like vegetable, canola, or peanut oil) to 350-375°F (175-190°C). Too cool, and the calamari will absorb too much oil and become greasy. Too hot, and the coating will burn before the calamari is cooked through.
- Fry in Batches: Overcrowding the pan dramatically drops the oil temperature, leading to greasy, soggy calamari. Fry in small batches, giving each piece plenty of room.
- Quick Cook Time: Calamari cooks incredibly fast – usually just 1-2 minutes per batch, or until golden brown. Any longer, and you risk turning that tender squid rubbery.
- Drain Properly: As soon as the calamari is golden, remove it with a slotted spoon or spider and transfer it to a wire rack set over paper towels to drain excess oil. Season immediately with a sprinkle of sea salt.
Serving Suggestions and Flavor Pairings
Perfectly fried calamari is a treat on its own, but it truly shines when accompanied by a vibrant dipping sauce and a squeeze of fresh citrus. A classic marinara sauce, a zesty lemon-garlic aioli, or a spicy sriracha mayo are all fantastic choices. Don't forget a generous squeeze of fresh lemon juice over the top just before serving; the acidity cuts through the richness of the fried seafood and brightens every bite. Pair it with a crisp white wine, a light beer, or a refreshing non-alcoholic spritzer for the ultimate Mediterranean dining experience.Troubleshooting Common Fried Calamari Pitfalls
Even with the best intentions, things can sometimes go awry. Here’s how to avoid and fix common issues:- Rubbery Calamari: The number one culprit is overcooking. Remember, calamari cooks very quickly. If you skipped the milk soak, that's also a major factor. Stick to 1-2 minutes of frying time and use the milk soak!
- Soggy or Greasy Coating: This usually means your oil wasn't hot enough, or you overcrowded the pan. Ensure your oil maintains the correct temperature (350-375°F) and fry in small batches. Draining on a wire rack is also crucial.
- Coating Falling Off: If your coating isn't adhering, you likely skipped the "resting" period after dredging, or the calamari wasn't patted dry enough before coating. The milk soak also helps immensely with adhesion.
- Bland Flavor: Don't forget to season your calamari itself (the salt in the milk soak helps) and generously season your flour mixture. A final sprinkle of sea salt immediately after frying makes a huge difference.
